About This Project

A 15–30 minutes craft for ages 3–12, using supplies you likely already have — Yarn, Hole Punches, and Tape.

GlueStick supports kids from setup to cleanup. After they choose a project, we guide them through gathering the supplies, making it, and cleaning up when they're done. We'll even help them share it safely with trusted family and friends.

Ad-free and kid-safe library — designed by a mom who wants kids to explore and create independently.
This project is perfect for:
Project Tags
  1. 1

    Find Supplies

    Do you have everything you need?
    Create a free GlueStick account to track supplies and see if you have what you need at a glance. Leave your kids tips about where supplies are stored in your household so they can set up and clean up their creative spaces independently.

    00:00
    A cartoon of Yarn
    Unknown cupboard quantity You have: unknown
    A cartoon of Glitter
    Unknown cupboard quantity You have: unknown
    A cartoon of Hole Punches
    Unknown cupboard quantity You have: unknown
    A cartoon of Tape
    Unknown cupboard quantity You have: unknown
    A cartoon of Pom Poms
    Unknown cupboard quantity You have: unknown
    A cartoon of Scissors
    Unknown cupboard quantity You have: unknown
    A cartoon of Pencils
    Unknown cupboard quantity You have: unknown
    A cartoon of White Glue
    Unknown cupboard quantity You have: unknown
    A cartoon of Markers
    Unknown cupboard quantity You have: unknown
    A cartoon of Construction Paper
    Unknown cupboard quantity You have: unknown
    A cartoon of Construction Paper
    Unknown cupboard quantity You have: unknown
    A cartoon of Glue Sticks
    Unknown cupboard quantity You have: unknown
  2. 2

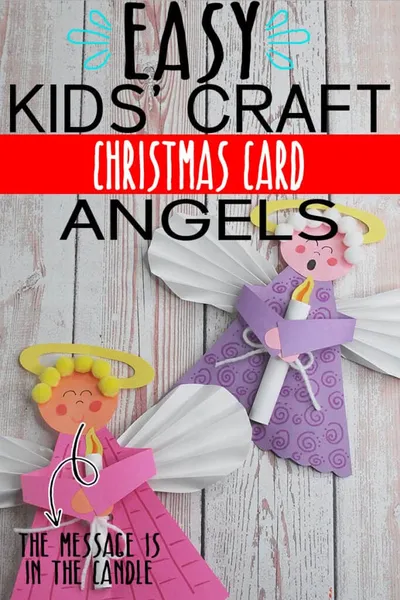
    Make Handmade Christmas Greeting Card Angels

    Your creative buddy says:
    "I can't wait to make a project with you!"

    Step 1: Cut Out the Parts of Your Angel Card

    May need grown-up help
    Choose any colors you like for your angel card. Draw and cut out a large triangle for the body, two small triangles for the arms, a circle for the head, two half circles for the hands, and a halo. You can also use a printable template to trace and cut out each part.

    Step 2: Put the Angel Together

    Before you glue, fold the large triangle (body) in half. Punch a hole in the center, not too far from the fold. You can also add fun details to your angel, like a wavy bottom edge for the gown. Glue all the parts together. Place the arms pointing a little bit down, and put the hands on the front of the sleeves. The arms will be folded in later.

    Step 3: Decorate Your Angel

    Use anything you have to make your angel pretty! You can use pompoms for hair or draw designs on the angel's gown. If you use wet glue, let your angel dry while you work on the next step.

    Step 4: Write Your Christmas Message

    Cut a white paper rectangle about 4 by 6 inches. From the yellow scrap paper, cut a small flame shape and add a little orange color to its middle. Glue the flame to the top left corner of the white paper. Now, write your special Christmas message on the paper.

    Step 5: Attach the Wings

    Use a printable template to cut two wings from white construction paper. Fold each wing like an accordion (back and forth), pinch the bottom, and tape it to hold the folds. Tape the wings onto the back of your angel. If you want to put your angel card in an envelope, do not accordion fold the wings. Instead, cut flat wings and glue them to the back.

    Step 6: Add Your Message to the Angel

    Take a small piece of white yarn, about 6 inches long. Thread it through the holes in the middle of your angel. Roll your message paper around a pencil, making sure the flame is at the top. Tie the yarn around the rolled-up message. Finally, fold the angel's arms to the front and glue the hands together. Gently press down so the hands look like they are holding the candle.
  3. 3

    Clean up

    Put things away so your space is tidy for next time.

    Tidy up our space

    Put away our supplies

    Check off each supply when it is put away — and any clean-up tips underneath are done too. You might find a fun surprise!

    • A cartoon of Yarn
      Where they belong:
    • A cartoon of Tape
      Where they belong:
    • A cartoon of Pencils
      Where they belong:
    • A cartoon of Markers
      Where they belong:
      • — Don't forget! Close all marker caps tightly.
    • A cartoon of Construction Paper
      Where they belong:
    • A cartoon of Construction Paper
      Where they belong:
    • A cartoon of Glue Sticks
      Where they belong:
      • — Don't forget! Put cap on glue sticks tightly.
    • A cartoon of Hole Punches
      Where they belong:
    • A cartoon of Scissors
      Where they belong:

    If you used these optional supplies, make sure they're cleaned up, too!

    • A cartoon of Glitter
      Where they belong:
    • A cartoon of Pom Poms
      Where they belong:
    • A cartoon of White Glue
      Where they belong:
      • — Don't forget! Close glue lids.

    Update what we have left

    Did we run out of anything while making this project? Update our supply cupboard so that we know exactly what we have for next time.

    This project could unlock 1 creative buddy. Sign in to unlock them.

  4. 4

    Celebrate

    Your creative buddy says:
    "Way to stick with it!"

    Made something awesome? Keep going.

    Your first project is free. Create your free GlueStick account to keep making — and discover projects you can do with the supplies you already have.

Upcycle supplies you already have in a flash

Snap a photo of your recycling bin, junk drawer, or fridge and GlueStick finds projects you can make right now with the supplies you already have — no store trip, no expensive kits, just more creative afternoons together.

+ 350 more
Supply Snap

About the Author

Last updated